You can take advantage of different objects that you have at home and give them a new use to order your earrings as well as necklaces or other jewelry items.
 Surely on many occasions when looking for specific earrings, it has been impossible to find them in your jewelry box because they were mixed with others, or because you have only been able to find one, but not its partner.
When it comes to organizing our jewelry, and especially those of fantasy, almost without knowing why, we fall into a small chaos of disorder where earrings get tangled with necklaces, pearls mix with each other and we end up losing even our own pins.
The most common is to resort to one of those small organizational supports that they sell in the jeweler stores themselves and that we place on our tables or dressers.
Now … What do you think if we make them ourselves by recycling things we have at home? With imagination, time and desire we can make beautiful accessories to place our earrings. We suggest you create your own earring organizers. Take note.
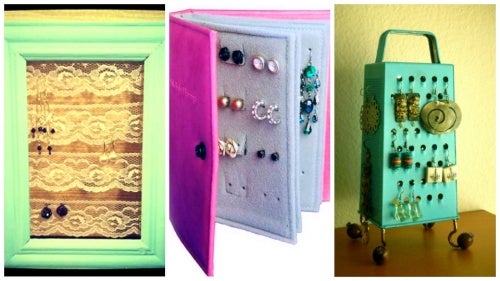
Earring organizer with… A grater!
Original and with a retro touch that you will love. Why not give it a try? We are sure that at home you have a greater that you no longer use, that you are thinking of throwing out or that it is already somewhat damaged or rusty. Don’t throw it away. Take note of what we can achieve with a few strokes of paint.
What I need
- An old grater.
- Striking paint(pink, green, red, yellow…).
How I do it
- The first thing we are going to do is clean the grater well.
To do this, we will use sandpaper. In this way we remove any remaining rust or any other element that can spoil our paint layer.
- Once the grater is clean, we proceed to give it a coat of paint. Choose a fun shade, a bubblegum pink, a sky blue, a passion red, a bright green… Something original.
- Once the paint has dried, we proceed to observe if the classic grater holes are still open or we have covered them with the paint itself. If you see that one is closed, open it with the help of a needle.
- Now you have it ready, you can now place your longer earrings on this original retro grater.
Earring holder… With a photo frame!
When it comes to making crafts and designing these types of objects, nothing better than reusing utensils that we have at home that we no longer use.
We are sure that you will have an old forgotten frame in a closet.
As we have done in the previous case, nothing is as effective as choosing a good paint and giving it a “pass” to get a completely new and fashionable object.
That is what we are going to do with an old photo frame. We will make it a beautiful earring holder. We explain how.
What I need
- A photo frames.
- An attractive color painting.
- Fabric ribbons, better if they are lace.
How I do it
- Once you have chosen the most suitable frame, remove the back, that is, where the photograph usually adheres to be held. We are only interested in the frame itself, nothing else.
- As always before applying paint to any surface, we will clean it well and apply a light sanding to remove previous remains of enamels, old paintings or dirt.
- Apply the new coat of paint, and then let it dry.
- Once it has dried, we proceed to place the fabric ribbons or doilies. They must go from side to side. To make them secure, you can either stick them with glue or use a professional stapler for this type of home DIY task.
It will be in these fabric ribbons where we will place our earrings. To hold the frame, you can put a small hanger like a normal painting. It is an original and decorative idea.
Earring holder – a beautiful travel wallet
This proposal is as beautiful as it is practical. When we travel our favorite earrings also go with us. If you want to have a practical and original support, we suggest you make this incredible “earring holder” portfolio. Do you dare to take a note to do it today?
What I need
- 3 cartons measuring 30 × 20 cm.
- Different types of fabric(one for making the “pages” of the portfolio and another for the exterior or the covers).
- Cloth and needle.
How I do it
- If you prefer, you can take advantage of the outside of any pocket wallet that you don’t use. The most important thing is to create those interior “sheets” that we will line to be able to place the earrings.
- To do this, line the cartons with the fabrics. Sew the edges, as you see in the image above. Later, fold them in half and sew them in the middle, over the lids that will close the wallet.
- Once we have sewn each cover to the wallet, we proceed to make the holes where we will place the earrings. You can do it with the help of scissors.
At first glance it seems somewhat laborious, but if you have time and are skilled with a needle and thread, this idea is one of the most beautiful you can do.